This year our youngest wanted to be Mega Man for Halloween. I had the perfect colored stretch lycra material already in my stash. I picked up the rest of the supplies at a thrift store. I used a basketball for the helmet. It worked perfect because it was soft and pliable and I was able to cut the shape with scissors. I used a football for the mega blaster. These were both covered with the lycra and glued in place on the inside with the glue gun. I cut a hole at one end of the football and wedged a flashlight in it. It serves two purposes. One, to use as a handle to hold the blaster, and two, as a cool light-up power source. I covered the lens with transparent red tape. The boots were made using thick plastic/foam placemats. They were also covered with the fabric. He LOVES it so I'd say it was a success!
Pages
▼
Oct 29, 2011
Where's Waldo and Wenda?
Oct 24, 2011
Going Bananas!
My crazy boys got the idea one day to make banana costumes from "egg carton" foam mattress pads. They even made one for my youngest. They made signs that said, "Please don't eat my babies," and hung out at the grocery store by the bananas...we'll at least the older ones did, I wouldn't let the youngest go (actually, I would have preferred that none of them go, but hey, they're teenagers!) They even wanted to stand on a street corner and see how much money they would get with a sign that said, "Need $$ my wife split!" I don't think they ever did that...at least I hope they didn't! I do know they went crazy running around the WalMart parking lot because I've seen video evidence of that!
Costume Tip: No real tip, just guard your foam pads, or you might end up sleeping on a hard mattress!
Oct 21, 2011
A Bun in the Oven!
Oct 19, 2011
Going Super Saiyan!
Personally, I just don't get Dragonball Z...it's A LOT of yelling, in my opinion! But, my husband and boys seem to enjoy it. Last year, our youngest wanted to be Goten. And, with his strawberry blonde hair all spiked up, he went super saiyen! The undershirt and black swim shoes were thrifted. The main jumpsuit (actually, two pieces for convenience) was made from broadcloth. You know, anytime I can make a costume that allows my son to carry a sword and run around screaming all the time, then I know it will be a hit!
You can't see in the picture below, but the excess t-shirt material that was cut from the bottom was sewn into "cuffs" around the ankles. Black swim shoes worked great to complete the outfit.
Just in case you haven't had the Goten experience...
Costume Tip: The small emblem on the front of the costume, and a much larger one on the back was made using my Cricut. I have Sure Cuts Alot v. 2.0...and LOVE it! I ironed heat-n-bond to some black broadcloth, then ran it through my Cricut to cut the image below. I lightly ironed that cut image to white broadcloth, cut around the circle, then lightly ironed heat-n-bond to the back of the white fabric. The whole image was then securely ironed to the costume. It's a great way to add details to a costume!
Click HERE to see more costumes!
Oct 17, 2011
Yo ho, yo ho!
I think one of the easiest thrifted costumes is a pirate. Its usually pretty easy to find "pirate" shirts, pants, vests, jackets, belts...whatever!
One event was actually a "trunk-or-treat" activity in the church parking lot. We decked out the back of the van with all sorts of pirate goodies. We even played pirate music from the van speakers. It was a lot of fun!
A large shirt, cut off at the sleeves, makes a good vest.
(These adorable pirates are my daughter and son-in-law.)
My black velvet coat was actually a dress (I'm going to guess from the 80's) that already had a flared skirt, satin and lace cuffs, and extra lace around the neckline. I just cut it down the front, added a satin collar (with the original collar lace on top), and added a few gold buttons. It worked great!
This was another activity where we wore our pirate outfits. My husband's boots actually only came midway up his calves. I extended them by using the top halves of sleeves from a leather coat I had thrifted for use in another costume. He just slipped the sleeves on first (inside out), then the boots, then he turned the wider part of the sleeves down to form a cuff for the boots. They worked great!
One event was actually a "trunk-or-treat" activity in the church parking lot. We decked out the back of the van with all sorts of pirate goodies. We even played pirate music from the van speakers. It was a lot of fun!
Costume Tip: Don't be afraid to dye suede. I picked up an awesome "70's" suede coat for only 99¢! It was a natural color, but I wanted it to be darker. So I filled the washing machine tub with hot water and dumped in some brown Rit dye. I added the leather coat and let it sit for awhile. When it was all done, I loved the way it turned out. The embroidery didn't take the dye, so it stayed tan in color and really "pops" now. The rest of the leather was a bit blotchy, but great for a pirate's coat!
Oct 15, 2011
A witch, an aviator, and Lightning McQueen!
I know I'm biased, but I think this is about the cutest witch ever!
She simplified a little by starting with a generic witch's costume. She then added on more colorful tulle, some purple satin, and trim. Decked out with some striped tights and this little witch is not so scary!
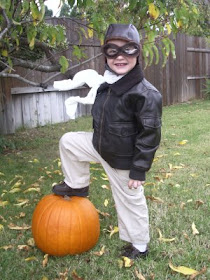
This handsome guy wanted to be an aviator. His favorite ride at California Adventure is Soarin' Over California. In fact, the last time we went to Disneyland, he brought his aviator hat to wear on the ride! (See below!) She made the hat and goggles and put wire in the scarf so it could be "blowin' in the wind!" The jacket was purchased, but got double duty the following year when he dressed as Indiana Jones.
And someone I know LOVES Lightning McQueen. She made this costume without a pattern! It took some time, but I think it turned out great! Here's a tip...download images from the internet, print them onto iron-on fabric sheets and add them as details to your costume. VVVROOOOM!
To see more of her creativity, visit easypeasypie.blogspot.com.
Oct 13, 2011
Walk Like an Egyptian!
This Egyptian costume is an award-winning costume! (Granted it was a local church function where it took the top spot in costumes, but nonetheless, award winning!) It consisted of a black t-shirt, long black slip (with added gold trim at the hemline), a stretchy piece of gold lamé fabric wrapped and tied in the front, a gold lamé collar with trim, sandals spray painted gold, and various gold jewelry. The "wig" is actually wide wale black velour fabric sewn as kind of a hoodie with bangs (if that makes sense.) I know that treasure-hunter Indiana Jones lived at in a different time period, but their worlds are still connected...don't you think?
And you never know when you might need to recycle a costume. This time it was Pharoah's daughter and baby Moses. This time I added a stretchy gold t-shirt over the top. The belt was a gold curtain tie-back with tassels. One month old "Baby Moses," adorned with his Hebrew cloth, had no idea it was Halloween!
In case you were wondering...the original backgrounds were busy and/or boring. So, the photos spent a little time in Photoshop!
Oct 11, 2011
Ash Ketchum and Pikachu
I didn't make this costume, but my son did...so I think it still counts! He entered his high school talent show with an original song he wrote about Pikachu. He thought it would be fun to dress up as Ash Ketchum. He grabbed some fabric from my stash and went to work...without a pattern! Anyway, it turned out great and added to his stage presence. He also painted the Pokemon characters used for the fight scene. A fight scene? What fight scene? Well, you'll just have to watch the video!
In case you're wondering who Ash Ketchum and Pikachu are and what they look like, here's a picture:
Oct 10, 2011
Autumn Porch
I love the Fall! Maybe its the illusion that, after a busy summer, life will begin to slow down. But, who am I kidding? With all the school events and holidays, it probably speeds up! But, nonetheless, I love the colors and the crispness in the air. So, in honor of this beautiful time of year, I decided to decorate the front porch.
If you can believe it, my Dad tried to get rid of this old bench (formally known as his "chainsaw-cutting firewood" bench) until I protested and hauled it home to my house. I don't know if my husband saw the beauty in it...probably still doesn't, but oh well!
The shutters were on our original house...years and years ago...and I've kept them for use in decorating. These are actually the back side of them. I liked the multi-colored "white washed" effect.
The bandana bunting was made by cutting the corners from four different colors of bandanas. I then pressed the raw edge over about 1/2". Next, I simply tied them together, alternating the colors. Raffia was tied in a bow around each knot. Simple and fun!
The bench is made from two ladder-backed chairs fastened together. Wood strips were added to form one continuous seat. The cushion is a thrifted pillow sham.
The black and cream pillows were made from some thrifted corduroy fabric and buttons. I was lucky enough to score a whole bolt of fabric for just $5! The little gold pillow was in my stash. I just added some raffia and a red button.
This rustic chair sits next to the bench. It was a freebie. I like the patina so I haven't painted it. These pillows were just 50¢ each at a thrift store. I just added a button and a band of fabric.
An old tea kettle with pansies sits nearby.
I love the old paint on this wheelbarrow! I picked it up for a few bucks from a garage sale years ago. It holds a few treasures...
a duck decoy...
an old shovel head...
and, a very rusty metal suitcase!
Happy Fall!!
Featured on: