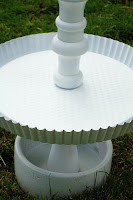
My son just got married and they opted for a shabby chic wedding reception. You can read the full post here. I thought you might enjoy a tutorial on how I made the cupcake stand. Everything was thrifted objects except for the threaded rod, nuts, and washer that hold it all together. Total cost, including paint, came in under $30! Not bad since I saw a pretty nondescript one on Etsy going for $140 plus $35 shipping!
I started with a shallow wooden bowl turned upside down for a base. Next was a round table top with a carved edge detail that actually measures about 24" in diameter. A wooden lazy susan was taken apart and used for the next level, followed by two metal trays—one with handles and one with sides. A metal tart tin with a fluted edge is next. The whole thing is topped off with a small wooden bowl with straight, deep sides. A decorative wire basket sits upside down on top of the bowl. Each level is divided by a variety of turned wood objects—a candle pedestal, salt and pepper shakers, and a lamp base. (Not seen in the "before" picture is the small wooden bowl with straight sides and the decorative wire basket...they were an afterthought!)
The first step was to decide how tall each wooden divider needed to be and cut them to size. I opted for about 5" between cake stand layers. That didn't mean that I could cut all the wooden dividers evenly, though. Some of my trays (the small wooden bowl, the tart tin, and one of the metal trays) had sides to them that I had to allow for. You can see what I mean in the finished picture. I opted to put the sides facing down on these levels so that a person wouldn't have to lift the cupcake up and over the edge. After measuring and cutting the dividers, they all needed holes through them to allow for the threaded rod. I was lucky with the lamp base, it already had a hole drilled done the center to house the electrical wires. The salt and pepper shakers were also equipped with a hole through most of it. The candle pedestal needed some help, so I put in on the drill press and drilled right down the center.
I also drilled a hole in each of the levels.
Next was to paint everything white.
This metal tray with the swirly handles is my favorite! Since the sides of this tray were very shallow, I left it upright. The other metal trays I placed upside down to make it easier to get to the cupcakes.
The top of the cake stand is a wooden bowl with straight sides. I drilled a hole part way into the underside so that I could countersink a nut into it. I then used epoxy to adhere the nut.
The threaded rod screws right into the underside of the wooden bowl.
Now its just a matter of putting it all together starting with the top layer and working your way to the bottom. The final layer is the upside down shallow bowl to be used as a base. I cut the threaded rod to size and my hubby touched up the threads with a grinder so that the newly cut threads would work properly. A washer and nut holds the whole stand together.
Once everything is tightened down, turn it over and enjoy! You now have a custom cupcake stand that will be the showpiece of any party! And, one of the best parts...it all comes apart for easy storage!
I like to link to these great parties!


.jpg)


.jpg)
That is absolutely beautiful and so creative.
ReplyDeleteErin from crafty-biggers@blogspot.com
I knew that day we ended up next to each other in the wood isle of the thrift store and you were explaining your cupcake stand project to me that it would be beautiful. And, it is!! Even more so than any I've seen available to purchase. You are one creative lady!
ReplyDeleteSpectacularly stellar in every way!
ReplyDeleteYour creativity is amazing!
ReplyDeleteI can't even imagine how it would be, organising TWO weddings so close... But I guess the advantage is you've already got the relatives gathered... :)
Having just discovered your inspiring blog, I peek in every now and then. And you have already inspired me to some refashion projects.
I already planned on doing a cake stand for my daughter's graduation next summer. But I was going to use pieces of china, and just glue them together. (Will still do that.) Now I'm really eager to go hunting through my 'treasures' (junk), to see if there's enough there to create a larger cake stand... (Otherwise I'll be 'foreced' to go treasurehunting!)
Can't wait!
Thank you for showing the rest of us all your good ideas.
sincerely, Ingela, Sweden
Love this. You did an awesome job putting it together. Thanks for sharing.
ReplyDeleteSusan, this is beautiful! You are so creative!
ReplyDeleteI love the different types of trays you used! pinned it!
ReplyDeleteThis is fabulous, unique and beautiful!
ReplyDelete歡樂吧視頻聊天室下載,免費寂寞聊天室
ReplyDeleteAVAV情色綜合網,夫妻秀視頻網站
真人秀聊天視頻網站,現場性愛視頻真人秀
快播色情電影網址,美女主播福利視頻仙桃
寂寞白領交友網,歐美性愛區
愛色軍團狠狠擼,午夜視頻聊天室大全
戀母論壇,韓國裸聊視頻
午夜秀場無限制直播間,網絡直播真人秀網站
七彩秀吧多人視頻,國外成人在線視頻網站
美女秀聊天室破解版,丁香美女社區
Really enjoyed this post! A decorative showpiece can instantly add character and elegance to any space. I love how a thoughtfully chosen accent can transform even a simple corner into something visually appealing. I recently explored FableCasa’s collection, and their decorative showpiece designs are creative, stylish, and perfect for enhancing modern home décor!
ReplyDelete