Pages

May 29, 2011

Fishing Swivel Charm Bracelet

I bought a very full gallon size bag of jewelry pieces the other day for $10!  Included in the bag were tons of earrings, bracelets, necklaces, rings, you name it!  Some of the pieces were still wearable and I added those to my ever growing jewelry collection.  Other pieces were broken, or had lost its mate.  I figured it might be fun to make an eclectic charm bracelet.  Even though there were lots of pieces of chain in the bag that I could have used, I decided to go with a chain of fishing swivels instead.  I made three separate chains using (4) #10 barrel swivels for each chain.  I added a couple of copper beads to each "snap" section before closing it.  I purchased a toggle clasp that allowed me to hook the three chains to it while providing a little space between the chains (you can see what I mean in the following pictures.)  I then proceeded to attach a variety of "charms" to the fishing swivels, most of which were broken or lonely earrings.  I figure I have less than $4 into the whole project!


If you click on the following picture to enlarge it, you can better see the pieces that I hooked the three chains to.  These pieces came with a toggle clasp attached to them, but I removed the toggle clasp and opted for a more traditional, secure clasp.


This bracelet is fun to wear and reminds me of the charm bracelet I wore as a young girl.

Linking up to THESE great link parties!


May 24, 2011

Cute Dresses From T-Shirts!

Is your little one in need of some cute summer dresses?  Here are a couple of cute ones refashioned from women's t-shirts!  The sleeveless blue dress was really simple to make on account of the pre-existing shoulder buttons.  The pink one took a little more time, but was still very doable.  Both would be super comfortable and perfect for summertime!


These are the two t-shirts that I used (plus a cream-colored t-shirt that isn't shown.)  Click here to view the tutorials on how I put these together.


May 17, 2011

Is That A Rug Under Your Fire Pit?!

With summer fast approaching, I thought I might post a project I did a couple of summers ago to add some color in my outdoor living space.  Besides the usual pots of flowers, I thought it would be fun to have more color and coziness around the seating area.  Naturally, my mind drifted towards an area rug. But, under the fire pit...probably not a good idea!  So I came up with this tiled rug....


I started with a round piece of plywood I had picked up at a recycle center.  I then collected various tiles and plates from thrift stores.  I also picked up a couple of bags of flattened marbles from the dollar store.  A little plate smashing, a little adhesive, a little tile grout, and a little (actually, a lot) of head scratching to get a pattern I liked and, voila!...a fire pit rug!  Now, having enjoyed this rug for the past couple of summers, let me give you a few pointers.  To help prevent moisture from wicking up into the plywood, I think it might be a good idea to raise it off the concrete a little.  I'm thinking of adding a few marbles around the perimeter of the underside to accomplish this.  Also, seal the grout well and store the rug inside during the rainy season to help prolong its life.  UPDATE 5/9/2014:  Maybe even a better idea would be to use concrete board (cut in a circle) as a base instead of plywood.  After having been in the elements for a a few years now, the plywood I used has began to separate and the tiles are coming off.  I think the concrete board would hold up better.  Have fun!


I linked up to this and other great parties...check out my party page!

May 16, 2011

I Won!!


Thanks to Fireflies and Jellybeans and Whimsy Couture for sponsoring this fun Iron Crafter's contest!  I'm looking forward to the next one!  In case you missed it, you can check out the winning entry here.

May 10, 2011

Spam Can Be A Good Thing!

I'm not talking about those annoying emails that show up in your inbox.  I'm talking about "spiced ham" in a can!  And why is it good?  Because those empty cans of Spam can go from this...


...to this!


...or this!


...or, even this!


...and, one more!


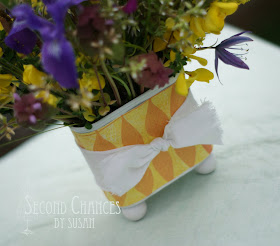
 All you have to do is first empty the cans by consuming the contents.  If you don't like Spam, then you better find someone who does and sweet talk them into giving you their empty cans!  As for my family, we have a bunch of Spam in food storage, so bonus points for me!  Then gather your supplies.  You'll need (4) 20mm wood beads for each can, spray paint, glue, scrapbook paper, small bookplates, and anything else you want to use for embellishments.  After washing and drying the cans, spray them, and the beads, the color of your choice.  Glue the beads to the bottom corners.  I used epoxy.  Wrap and glue paper around the body.  You could apply the paper with mod podge to make it more durable.  Attach the bookplate with glue, or by punching holes and attaching with small brads.  Embellish with ribbon, strips of fabric, jute, etc.  The possibilities are really endless!  Have fun! 

Featured on:

May 9, 2011

I Made the Top Five!


I was excited to see this morning that I had made the top 5 in the Iron Crafter competition!  If you like my funky vinyl belt, head on over and cast a vote before Friday!  Thanks!!

May 5, 2011

Girl, Put Your Records On...LITERALLY!

Fireflies and Jellybeans is hosting an Iron Crafter Challenge this week.  The secret ingredient to use is anything vinyl.  I liked the idea of using old records.  My first thought was to melt and reshape them, but that thought soon left.  The next thought was to make a purse out of them.  But, that thought left my mind also.  Come to think of it, a lot of thoughts leave my mind....but that's a different story!  Anyway, the thought that actually stuck was to make a funky belt to wear.  So, this is my entry...I used old 45's, vinyl fabric, and silver brads.  It took a bit of figuring, okay, maybe a lot of figuring, but I'm happy with the way it turned out.    I hope you enjoy it.


To see a tutorial on how it was made, click here.


May 2, 2011

Release your inner artist....with spray paint!

While cleaning out the garage the other day (long overdue!), I took some pictures of a dresser that was needing to find a new home.  I had painted this dresser for the nursery of our last child.  I realized that the technique I had used might be helpful to others.  I had also used the same technique recently on a cute little metal cart.  You simply paint your base coat, then when dry, overlay with lace fabric and spray with spray paint.  You can go lightly, or heavy, depending on the look you want.  As for the dresser, I picked it up at a garage sale for $6...it was pink at the time.


After the jump is a closer view of the technique.