Jun 27, 2011

Nautical Inspired Dress Refashion


I love blue and white together...so clean, crisp, and nautical!  This latest dress refashion was from a woman's blouse and a man's shirt.  I opted for a scoop neck, short sleeves gathered into a band, and an empire waist.  The blouse top is lightweight cotton,  the shirt bottom is a heavier, soft velour-type fabric.  I added a pop of color with my large red bag, red earrings, and red heels.

The front.


The side.


The back.


A close-up of the dress.  


I left both pockets on the shirts.  Partly for design, and partly because I was too lazy to pick them off!  Plus, whenever you remove the pockets, you can always see where it has been stitched.  With a printed shirt, you can sometimes get away with it.  On a solid shirt, its pretty obvious.  I cut the blouse just below the bustline, adding extra length for ease and seam allowance.  I cut my sleeves, gathered them into the band, and attached them to the bodice.  I cut the skirt as long as I could from the shirt.  I then stitched the side seams of the skirt to fit my hips, and added two darts in the back to fit the curve of my back.  I gathered the bodice and attached it to the skirt.  Since I was working with a man's shirt and a woman's blouse, the buttons were opposite.  So, I had to switch the buttons on the blouse and add new buttonholes.  The scoop neck was finished with bias tape turned to the inside and topstitched.


One more overall view.


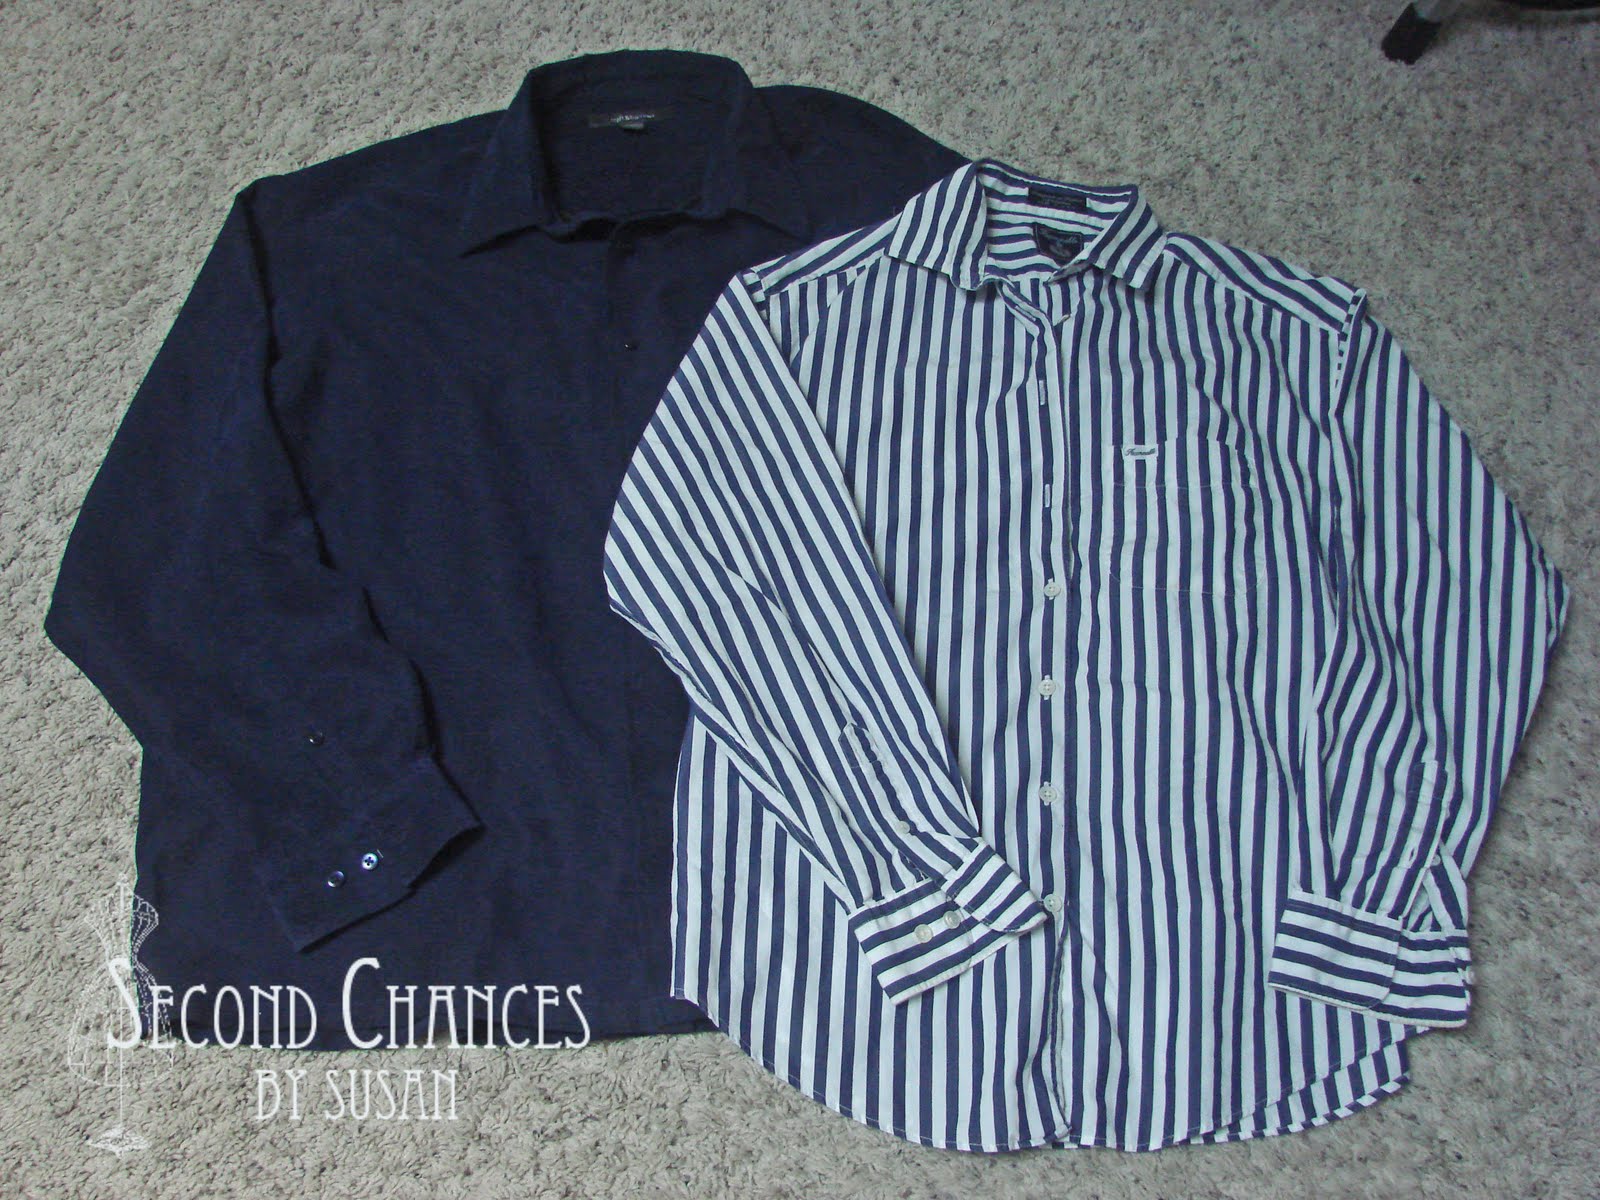
This is where it all began...two 99¢ shirts from the thrift store!


 Happy sewing!

Linking to THESE great parties!

Featured on...


Boogieboard Cottage

This dress was also featured in...


Jun 22, 2011

I Love the Red, White, and Blue!

I love this time of year!  Summer is officially here...the weather is great...and I can decorate the front porch in red, white, and blue!  There is something about the Fourth of July that brings back so many good memories.  As a young girl, I loved watching the fireworks with my family.  Anything americana makes be yearn for yesteryear when things seemed simpler and more innocent.  So any excuse to bring back good memories and to show some patriotism, I'm game!

I picked up this chair for free a few years ago.  I painted it cream and distressed it.  I made the bench years ago from a couple of headboards.


I found this old metal chair on our property...and love it!  The shutters came from the original house that used to be here before we rebuilt.  I hinged them together years ago to create a folding screen.  The old flag was purchased from a thrift store.  Buntings are all over the web these days.  I love them, but wanted to do something a little different.  I tore 3/4" strips of cotton fabric and tied them onto some cotton cording.  Then I gathered the red, white, and blue strips at the bottom and tied them with another strip of white fabric to form each triangular "flag."


I found a quilted pillow sham the other day at a thrift store.  I loved the design and the "weathered" look of the fabric.  I brought it home,  cut it in half, and serged the raw edges.  Then I tore 1" x 10" strips of denim from an old shirt.  I folded the strips in half to find the middle, then I stitched the middle of each strip to the top edge of the sham.  This gave me strips that are now 5" long.  I did this to both sides.  I ended up with 30 full strips sewn to each side (or, 60 5" strips on each side.)  So, when I tied them together, I was using two strips from each side tied together in one knot (30 knots total on each pillow.)  Of course, I inserted my pillow form before I tied them! :o)


I made chair cushions from a couple of striped pillow cases.  The top button detail allows me to remove the coverings for washing.  Remember, if you do this detail, you need to make buttonholes in both layers of the pillow case!  If you put the layers together and make your buttonholes...oops, you won't be able to get into it!


Some sweet people I know gave me this drop leaf table a few years back.  I immediately painted it red.  I think every porch needs a red table.  It is so versatile with decorating...Christmas...Valentine's Day...Independence Day...you name it!  The tablecloth is an old flag with borders of patriotic fabric.  And, I love the basket of strawberries...YUM!


Have a happy Fourth of July!
God bless America!

Linking to THESE great parties!

And...


And also the Red, White, and Blue Challenge at....

Visit thecsiproject.com

Featured on...


36th Avenue  Visit thecsiproject.com   Boogieboard Cottage  


Jun 13, 2011

Mens' Shirts to Dress Refashion...the sequel!

I found a HUGE shirt at the thrift store the other day.  It was 4XLT!  So needless to say, there was a lot of fabric to work with.  I really liked the print...green palm trees and orange lighthouses.  It kind of had a retro/vacation feel to it.  So I picked it up, along with another shirt.  I paid $2.49 a piece for them.  I would have preferred a 99¢ Monday at Value Village, but I'll take what I can get.  This is what I came up with...a SUPER comfy summer dress that can be worn with or without a belt.


So the first thing I did was to try it on and get a feel for where I was going to cut.  I figured I wanted about a 6" wide waistband, so I placed a pin on the shirt about 3" above my waist.  I laid the shirt out flat and cut it straight across where I had pinned (allowing an extra 1/2" for the seam.)  Then I cut the collar and band off about 1" above the button.  The sleeve seams hung down far enough on my arms that all I had to do was cut them off about 3/4" away from the seams on the sleeve side.  This would allow for me to serge the edges, then fold them under and top stitch the armholes.  I then laid it out flat again and decided how big the arm openings were going to be.  I cut them to size (allowing for seam allowance) and then continued to cut away some of the sides so there wouldn't be so much to gather into the waist band.  (Essentially, I opted for a sleeve/bodice one piece combo instead of a set in sleeve.  My research tells me its called a magyar sleeve!)  The next step was to cut a waistband from the other shirt.  No technical stuff here.  I just cut it 7" wide.  Then I stitched two darts in the front and two darts in the back, along with taking it in on the sides until I got it to fit the way I wanted.  I thought that the darts would give it a little more shape, but if you're going to belt it anyway, you could save some time and skip them.  Then it was a matter of gathering and stitching the top and bottom to the waistband.  This shirt happened to be hemmed straight across with side slits so no further hemming was necessary.  To finish the neckline, I used 1/2" bias tape, stitched, then turned to the inside.  I then topstitched it into place.  I did add an extra button to the waistband, and two more buttons at the bottom of the dress so it wouldn't fly open.  All of these buttons were the extras from the shirts.  I love that its 100% cotton, comfortable, and easy to make!  I will be scouring the thrift stores for more super-sized shirts!  Here's my BEFORE shots...


Linking to THESE great parties.

UPDATE:  This happened to be the most viewed link for the week at:

mommaskindacrafty

Thanks!

Also featured on:


Photobucket


Jun 5, 2011

Men's Shirts to Dress Refashion

Like so many other crafty people out there, I like to take secondhand clothing and refashion them into something else.  It's great because you get to take advantage of the existing details.  My latest project has been to make myself a dress from two men's shirts.  I found a nice green and white striped shirt the other day for 99¢ that I really liked.  I brought it home and, to my delight, found a green and white gingham shirt in my stash that I had purchased a while back...just because I really liked it at the time!  It was a perfect match.  I had an idea of what I wanted to do and knew I needed some white fabric for the pleats.  So out came a white sheet.  Actually, I have a ton of sheets thanks to a friend that works for a hotel chain.  They are always getting rid of sheets that have a tear or something, but are in otherwise good condition.  So I measured, cut, stitched...picked out some stitching a time or two, or three, and stitched again.  The end result is this...  


The dress buttons all the way down the front to make it easy to put on and take off.  There are two pleats in the front, and two pleats in the back.  I topstitched the pleats down about 6".  I added a band of white fabric for length.  I stitched 1/4" elastic to the waist seam.  The elastic wasn't absolutely necessary since I wear it with a belt, but I thought it would make the waist gathering more uniform.


I opted for a scoop neck and was going to just do a simple finish with seam binding, but then I thought a small white collar would help to balance the white band at the bottom.

                                                                                   
And just to show you what I started with, here are the shirts...


Linking to THESE great parties.


This dress was also featured in...