Dec 27, 2013

No More Gap!


I don't know about everyone else, but I have a problem with jeans gaping at the back waistband.  They fit well everywhere, except at the waist.  So here's a quick fix...maybe 15 or 20 minutes tops!


Dec 23, 2013

A Missionary Stocking

I know you can find variations of these missionary stockings on the internet.  


Some creative person came up with the original idea and, unfortunately, I don't know who it was so I can't give credit...sorry!

My missionary son, however, is a vest-wearing kind of guy.  So, I did my own version of a missionary stocking.  You can check out the step-by-step tutorial after the jump.


Dec 7, 2013

DIY Dig Kit


What is a dig kit you ask?  Well, its something that your Minecraft enthusiast might enjoy, or a budding archeologist.  I happen to have both in the form of grandsons.  This was a super simple gift to make, but it yielded high rewards.  I picked up the following supplies:


•plaster of paris
•cinnamon
•beach sand (from the sandbox)
•foil pans (2 for $1 at the dollar store)
•cooking spray
•rocks and trinkets
•kitty litter (optional)


To complete the kit, you might opt for safety goggles, hammer, chisel, magnifying glass, and a small paint brush.


Nov 30, 2013

Hello Kitty Denim Jacket


My little granddaughter loves anything to do with kittens.  So its only natural that she would also love anything to do with Hello Kitty.  Christmas came early this year due to a Thanksgiving visit from the grandkids instead of a Christmas visit (due to baby sister who is due around Christmastime.)  We'll miss them at Christmas, but we had lots of fun with them this past week!

I try to make as many gifts as possible each year.  I looked at Hello Kitty denim jackets in the stores and figured with a price tag of $25-$35, this would be a good handmade gift...or at least a refashioned gift!

I started with a thrifted denim jacket and Hello Kitty tank top.  Both were in excellent condition and only set me back a total of $5.


Nov 4, 2013

Romantic Country Magazine


I'm thrilled to announce that my collapsible dollhouse, which was made for my granddaughter last Christmas, caught the attention of the powers that be over at Romantic Country magazine.    They decided to include it in their wonderful magazine.  The Winter 2013 issue is on the newsstands now.  It's a lovely magazine filled with beautiful eye candy and I'm excited to be a part of it!


Have a great day!

Nov 2, 2013

Thank you, thank you, thank you!

I don't want to sound like I'm tooting my own horn, but I was completely shocked to find out this morning that I actually came in first place for the second season of Refashion Runway!  Seriously, everyone has been so creative over the past several weeks that I just couldn't see a clear winner.  It really could have been any one of us!  All I can say is that the final vote tallies must have been very, very close!  

A big thank you to Beth, a.k.a. The Renegade Seamstress, for hosting Season Two of Refashion Runway.  It has been great fun competing each week with a different, often times challenging, theme.  Each of the ladies competing really went all out to present a beautiful and creative refashion each week.  I am grateful to have been a part of it.  

Thank you to all of you who voted for me and supported me along the way.  I especially appreciate my family's support, as they have been a bit neglected at times over the past few weeks.  Its been a fun journey and I appreciate the new friendships that I have made!  Please keep a watchful eye on these talented and creative women and see what wonderful things they do in the future!

Carissa, Carissa Knits

In case you missed any of the weeks, you can check out what I presented each week by clicking on its title.


Oct 28, 2013

Vintage Winter White


I'm not sure why, but when I start thinking about winter and the holiday season I get all nostalgic.  I love looking at pictures of the holidays during the 50's.  Everything seemed to be so much simpler then.  (Although, I wouldn't really know since I wasn't born yet!)  So it was natural for me to be drawn to a vintage vibe when it came to the winter white challenge.

I gathered all the white and cream things I had in my stash and gave some thought as to what I could do.  I decided on a stretch lace formal gown, a sheer curtain panel, a drapery panel, a piece of ultra suede, and a bag of pearls.  Later I added a linen blouse with crocheted lace.


Oct 19, 2013

Bewitched!


This week's challenge for Refashion Runway was Halloween.  I love costumes, so this was a fun one for me.  In fact, if you'd like to see some of my previous costumes (or some by my family members) over the years, you can click on the costume category in the side bar.  Make sure when you get to the bottom of the page that you click on "older posts" to see more of them.  Anyway, onto the challenge...

I began with six thrifted items that I had in my stash—a blouse, skirt, dress, jumper, brocade dress, and sweater.


I'll try to break down the process the best I can.  

Oct 14, 2013

The Leather Challenge


This week on Refashion Runway, the challenge was leather.  As has been throughout this whole competition, I have only used things that are in my refashion stash.  I had a couple of leather items to choose from.  A black coat and a grey suede shirt.  I preferred the grey over the black, so that's what I started with.  Also in my stash was a sweater that my son was getting rid of, and some wool fabric I had picked up long ago at a thrift store for $1.50.  Considering that the sweater was free, and the shirt was $2.00, this outfit cost me $3.50.  And, I have lots of grey suede left over for future creations!


Since this refashion consists of four parts, I'll show you how each was accomplished.

Oct 5, 2013

The Peplum Challenge

Week three of Refashion Runway challenged us to make something with a peplum.  I have to admit that I haven't been all that enthusiastic about peplums, but a challenge is a challenge!  As I was looking through the possibilities that I had in my stash, I figured this would be the perfect time to use some of the vintage lace I salvaged from a petticoat.  And, lucky me, I had a denim shirt in my stash that already fit pretty good.  So, if you're interested in the details, there are lots of pictures to follow!


This is what I started with—a pile of lace, a men's shirt, and a women's blouse.


And here's how it was done....


Sep 28, 2013

It's Good Being Green!

This week's Refashion Runway challenge was Pantone's 2013 Color of the Year, Emerald.  Since I have made a goal to use up things already in my refashion stash, I was limited with finding something that fit the challenge.  My only real choice was this 100% silk dress–shapeless, with a few added details.  But I did like the fabric, and I had picked up months ago for only 50 cents!


Sep 21, 2013

Mad For Plaid!

Week one of the Refashion Runway challenge has been lots of fun!  This week we were challenged to make something using plaid.  I chose a few men's shirts that I had in my stash—a couple of plaid shirts that were cut on the bias, one striped shirt, and one blue shirt (not shown in the "before" picture.)  You might notice in the background small glimpses of my new sewing studio, which is almost finished.  Watch for the big reveal in the future!  Now, back to the challenge...


I got to work carefully picking off the pockets.  Then I cut 3 1/2" strips from the bodies of three of the shirts.  After sewing these strips together I set them aside and went to work on the bodice.  I cut the front pieces of the bodice from the back of the shirt, and the back pieces of the bodice from the front of the shirt.  That way, I could take advantage of the buttons going down the back, thus eliminating the need for a zipper!  I replaced the shirt buttons with dressier buttons.  I cut my new short sleeves from the old sleeves.


I trimmed the scoop neck with a band of the plaid fabric.


The previously sewn strips were pleated and attached to the bodice.


I added a couple of belt loops to the sides.


Just a small hem at the bottom and that completes my plaid entry for Refashion Runway, week one!  Be sure to check out all of the wonderful entries at the Renegade Seamstress and vote for your favorite!  (UPDATE:  Voting for week one is now over...thanks!)


Sep 14, 2013

Refashion Runway: Season Two


I'm so excited to have been chosen as a contestant for season two of Refashion Runway!  Beth, a.k.a The Renegade Seamstress, is hosting the friendly sewing competition.  I followed along last time and had fun voting for my favorites.  Now, as a contestant, I'm excited and nervous!  As a side note, a few months back I made a commitment to myself to not buy anymore articles to refashion (at least for a while.)  So, that personal commitment is still in force, which means each weekly challenge is going to have to be completed with items I already have at home.  That should make it interesting!  If you'd like to sew along, the challenges are as follows:

Week One: Plaid
Week Two: Pantone 2013 Color Emerald Green
Week Three: Peplum
Week Four: Leather
Week Five: Halloween
Week Six: Winter White


Well, I better get busy!


Sep 13, 2013

A Refashioned Bridal Shower

Recently, my friend and I had the pleasure of giving a shower to a beautiful bride-to-be.  In keeping with the theme of my blog, most of the decorations were made from thrifted items.  The centerpieces were made from miscellaneous tins spray painted in the bride's colors and then embellished with paper, ribbons, and trims.  The tins easily stack on top of each other.  There was no need to glue them together, plus it makes for easier storage after the event.  Also, after the flower was glued to the bow, I added a magnet to the back to attach it to the top of the tins, which makes for super simple removal and storage! 


The backdrop to the dessert table was from thrifted fabric, and a thrifted window scarf.  Even the ribbons were found at a thrift shop.  The silk flowers came from the dollar store.


My present to the bride-to-be was an apron from...you guessed it...thrifted items—a skirt and blouse that I had previously turned into an apron (and tucked away waiting to be gifted to the right person.)  It just happened to be in the bride's colors, so I thought it would be a fitting gift!


So with a little imagination, you can decorate for a cute bridal shower without spending a lot!

I like to link to these great parties!


Aug 14, 2013

Girl's Camp Crafts

I've just returned from another year of Girl's Camp where my friend, Lisa, and I are the "Crafty Ladies."  It can be a lot of work, but also a lot of fun.  Here's a run down of what we did.

The "Super Strap" Water Bottle Strap


This year the adult leaders wanted to encourage the girls to carry around their water bottles, especially on the hikes.  We thought a good craft would be a water bottle strap.  I searched around the internet for ideas, then came up with something that would fit our needs at camp.  The main criteria for this craft was simplicity and no sewing!  My son, the night before leaving for a two-year church mission, recorded a song for me to use as an infomercial for the "Super Strap."  He wrote the music, played the instruments, and recorded the vocals.  I wrote the words and added the pictures.  As a side note, I'm going to miss his musical creativity over the next couple of years!


The straps were easy to make.  We cut strips of single knit fabric, 1" wide by the width of the fabric.  (Approximately 54-60" wide.)  


To make the strap, layer three strips on top of each other and thread the first 6", or so, through a round rubber gasket.  Note:  I searched around and found a gasket that fit over the cap of the water bottle that was provided for the girls.  When finding a size that will fit, take into consideration that the fabric will loop over two sides of the gasket, thus making the opening a bit smaller.  But, also consider that the gaskets stretch a little.  Our gaskets were rounded so they kind of "rolled" over the cap when putting them on.


Once the fabric strips are threaded through the gasket, fold the strips back on themselves and begin to braid your strap, encasing the ends of the strips as you braid.  To make the braiding easier, we had a 2x4 clamped to the table with binder clips screwed in place.  The girls were able to clamp their gasket in place, making it easier to braid.  Continue braiding until you get about 6" away from the end.  If your strips aren't the same length, trim them to match each other.


Thread the unbraided final 6" through the gasket again (only on the other side of the gasket) and fold the strips back onto themselves.  Using a safety pin, pin the end of each strip, one at a time, and weave the end back through the braid.  Note:  It helps if the strap is not braided super tightly!


If desired, you can use a dab of hot glue to tuck and secure the ends in place.  Depending on the stretchiness of your fabric, these can sling over the shoulder, across the body, and still hang a bit too low.  If that's the case, just tie a knot at the shoulder and bring the water bottle up to the desired length.  Obviously, the water bottle will hang lower when its full of water as opposed to when its empty!

Those individuals that do a lot of hiking will probably want a more sturdy way of carrying their water, but as for a girl's camp craft, this was inexpensive, useful, and the girls had fun making them!

Reflection Boards


This idea was not original.  We followed the tutorial found on the website, Brave Girls Club, for their dream boards.  We chose to call them "Reflection Boards" as we were always trying to reinforce that the girls see their true nature and inner beauty.  It was a fun activity, needed little instruction (woohoo!) and allowed the girls' individuality to really shine!  We ordered 9 x 12 canvas panels through Wholesale Arts and Frames for the base.  They were cheaper than stretched canvas frames.  Prior to camp, we asked for donations of unwanted scrapbook paper and embellishments from church members.  We were flooded with generous donations!  The girls had many cute things to choose from.  One 16 oz. bottle of Mod Podge was probably all we used for about 30 boards.

Beaded Macrame Bracelets


The girls needed to learn knots for certification, and this project reinforced their knowledge of the good ol' square knot!  We followed this great tutorial on the website, Smitten By A Knot.  We precut the cording and had packaged them in snack baggies.  The girls were able to choose their own beads.  I demonstrated the tying process by using a rope attached to a piece of foam core so they could see an oversized version of the process.  We used the same 2x4's with binder clips as we did with the super straps to secure our cording—along with a small piece of cardboard to pin into.   One trick we learned to make things easier was to tape the ends of the filler cords to the table, thus keeping them tight and free from tangles during the knotting process.  Just un-tape the filler cord when adding a bead, then re-tape in place.  This project required more instruction than our other projects until the girls got the hang of it.

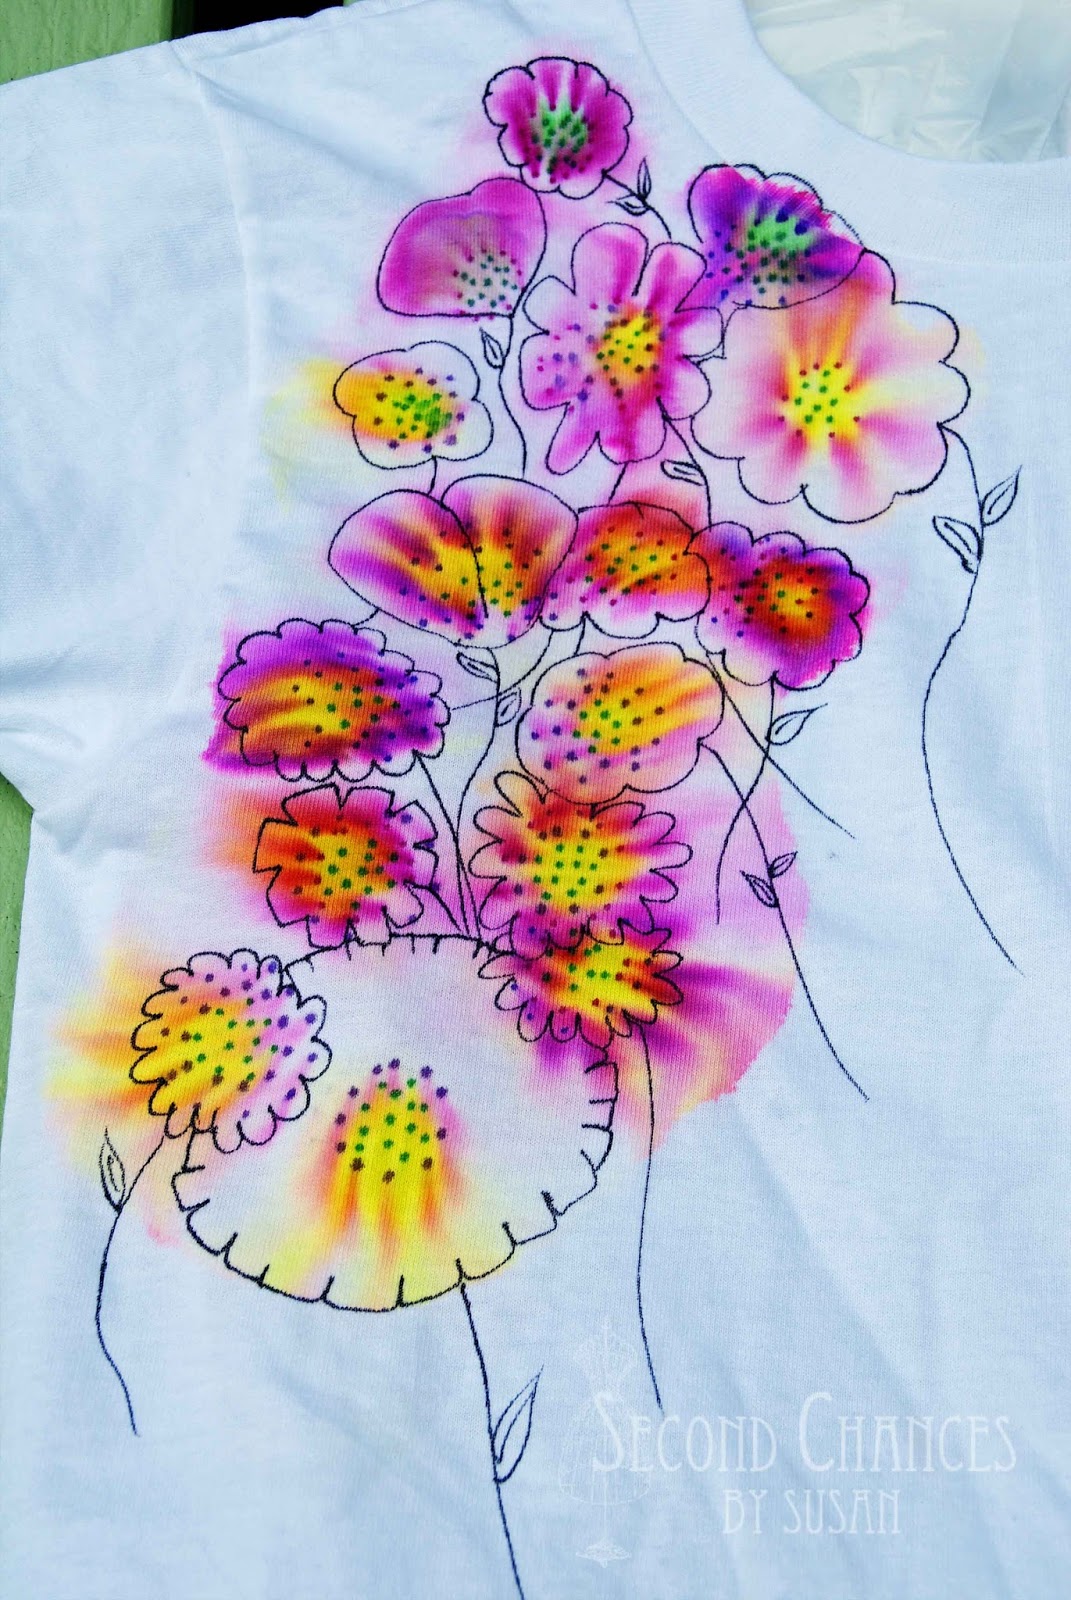
"Tie Dye" T-Shirts using Sharpie Markers


This was a fun, and very easy project.  You can find a few different ways to do this project.  We just had the girls place an eight gallon plastic bag in between the layers of their 100% cotton shirts.  They drew designs onto their t-shirts with sharpie markers, then dripped rubbing alcohol on the designs and watched the ink spread out.  I got the droppers from a pharmacy, and the best buy on markers was at Costco.  As for the rubbing alcohol, we used 70% solution.


It was fun seeing the different designs.  Some made circles of dots,


some drew "starbursts" (or asterisks),


some wrote words,


some placed their design tightly together,


and some added detail, when dry, by using an ultra fine sharpie.


We did notice that the ink spread out better on the 100% cotton t-shirts, as opposed to a blended t-shirts.  Also, some colors spread better than others so you might have some scraps for the girls to experiment with.  Heat set the t-shirts with a hot iron or dryer before wearing and washing.

It was another fun and successful year of crafts!

I like to link to these great parties!