Showing posts with label jewelry. Show all posts

Sep 23, 2018

Girl's Camp 2018 - The Beads

I had a great time coming up with beads for Girl's Camp this year.  The Alice in Wonderland theme was a lot of fun to work with.    Some of the beads were ordered off the internet, some were made using Fimo clay, and some were hand painted.  Here are a few of the beads...


Camp Kick-Off Bead

Aug 13, 2016

Refashion Runway: The Metallic Challenge

Last week's velvet challenge was a lot of fun and a big thanks to everyone who voted!

This week's challenge for Refashion Runway is Metallic.  I really didn't want to make something that was too formal, which seemed to be the natural thing to do with metallic fabric.  I opted, instead, for a more casual look with metallic accents.  I started with a fleece-lined jacket, shower curtain hooks, a sequined t-shirt, and a studded blouse.

Oct 26, 2014

Gears, Gadgets, Goggles...Steampunk!

Every year our church has a Harvest Festival, which includes a chili cook-off, entertainment, trunk-or-treat, and costumes!  I love costumes and thought this year it would be fun to dress in a steampunk style and decorate the "trunk" of our van to match.  In case you don't know what steampunk is, here's what Wikipedia has to say about it:

Steampunk is a sub-genre of science fiction that typically features steam-powered machinery,[1] especially in a setting inspired by industrialized Western civilization during the 19th century. Steampunk works are often set in an alternative history of the 19th century's British Victorian era or American "Wild West", in a post-apocalyptic future during which steam power has regained mainstream use, or in a fantasy world that similarly employs steam power.

So basically, I like to think of steampunk as Victorian Sci-fi, i.e. really fun costumes!  Of course a trip to the thrift store was in order.  As luck would have it, I discovered a local thrift store had already gathered steampunk inspired clothing and decorations and made a whole display from them.  Plus, it was half off women's clothing that day, so I got my jacket, black velveteen vest, and crushed velvet skirt all for $7!


I found a lace skirt at another thrift store.  Add that to the hat, belt, jewelry, boots, and victorian blouse I already had and I was well on my to completing my costume.


Aug 9, 2014

Girls Camp Crafts 2014

Summer is a busy time for most people, and I'm lucky to have a portion of my summer spent at Girl's Camp.  And, I'm even more lucky to spend my time at camp doing crafts!  How great is that to do crafts in the beautiful outdoors amongst beautiful young women?!  So here's the run down of what we did this year.

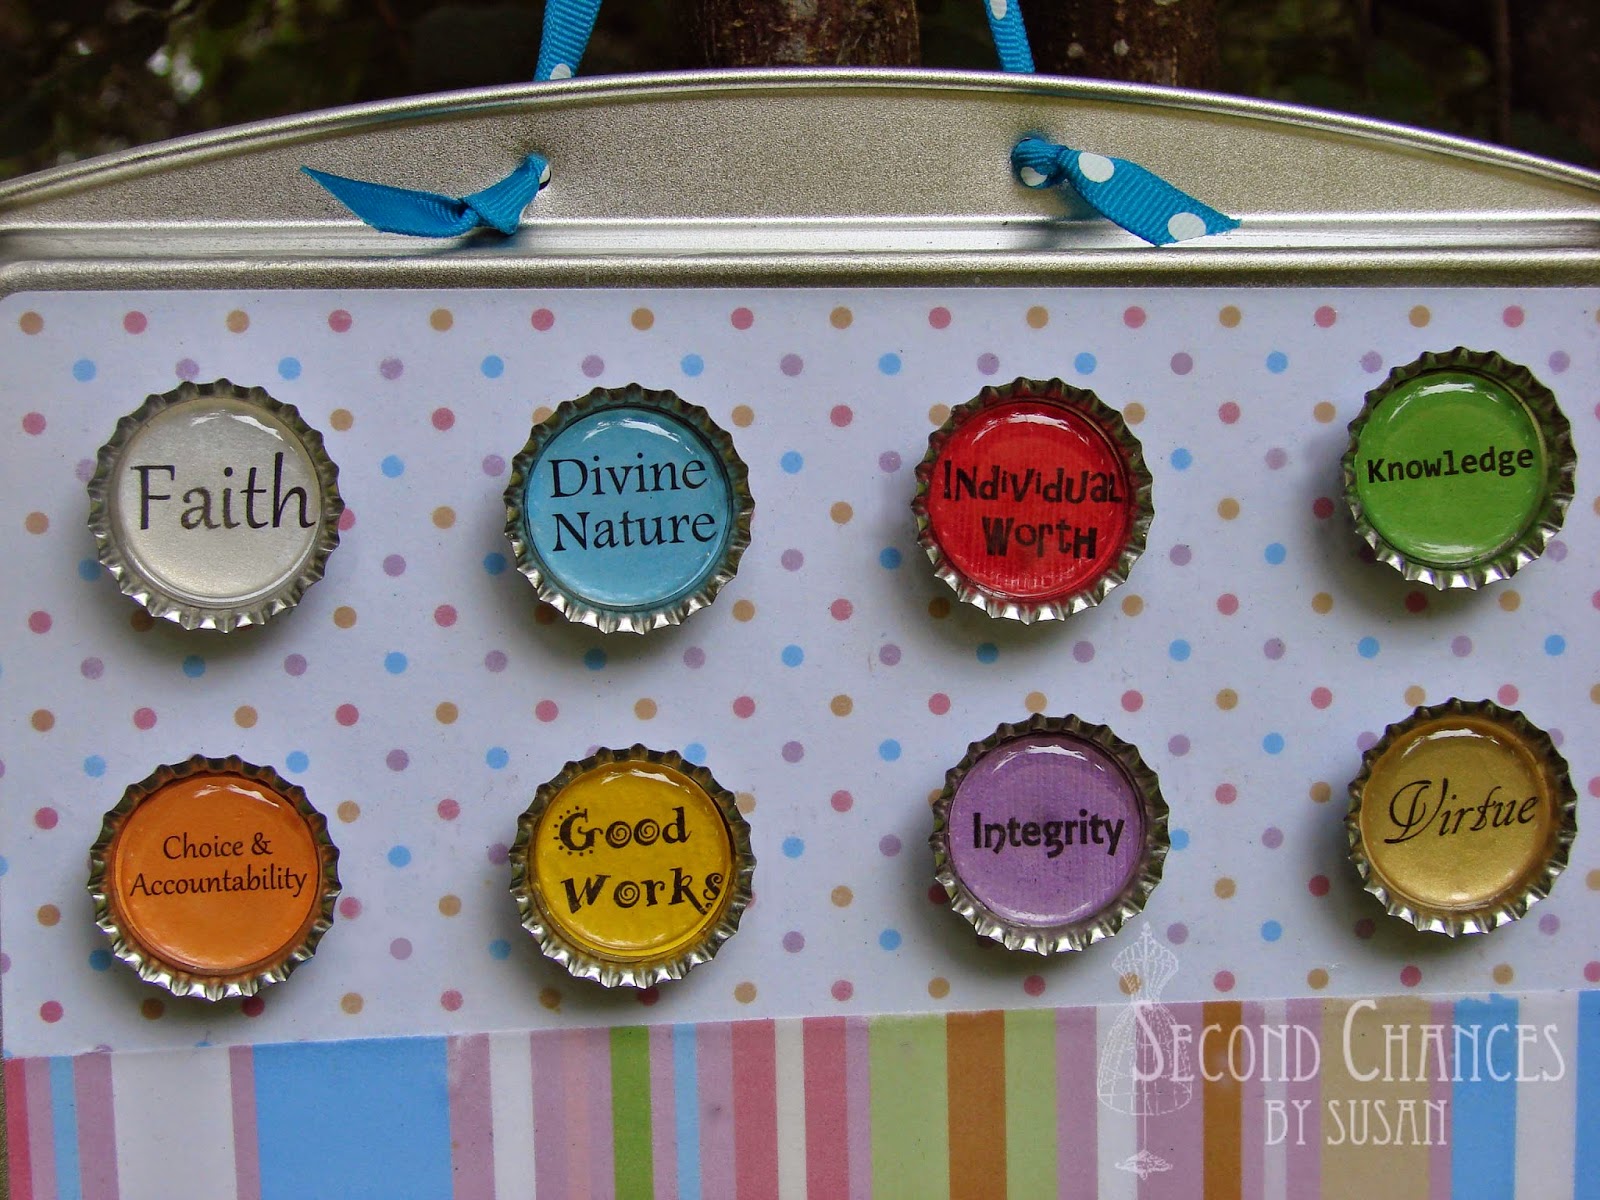
Magnetic Bulletin Boards

The first day we made these cute magnet boards.  We started with a 9x13 cookie sheet purchased from the dollar store and/or WalMart.  We cut our paper to size and adhered it to the back of the cookie sheet using mod podge.


While we waited for the mod podge to dry, we made these cute magnets.  We had already printed the words onto colored paper and a 1" punch was used to cut them out.  The girls glued the circles to the inside of the bottle caps, then once dry, covered the circle with the epoxy sticker.  Magnets were glued to the back using E-6000 glue.


Once the mod podge was completely dry (using a hair dryer, or letting it sit overnight) the vinyl lettering was added.  The last step was to drill two holes and add the ribbon hanger.  One tip:  The holes are actually easier to drill before they start the project, and a small file is necessary to remove any metal burrs that are left as a result of drilling.  


Follow the links below to see where we bought the supplies:

or, you might like these magnets better
as they are smaller and have a lower profile.

Temple Pendants

Day two had us doing these super easy necklaces.  The original idea can be found on SugarDoodle, along with the information of where to purchase the supplies, and also a file for the images used in the necklaces.  Follow the directions they suggest and give them plenty of time to dry.  We let ours sit overnight.


These images were cut with a 1" punch just like the magnets.  These, however, were covered with a glued on glass bubble, as opposed to an epoxy sticker.  Please note, I was unable to photograph these without getting reflective glare on the glass, so please excuse what looks like strange white patches on the photos...they are only an illusion!


The necklaces were super easy and took all but about 5 minutes to complete.  Our girls have several activities available for them during their free time, crafts being just one of them.  So, this project allowed them to experience some of the other fun things at camp.


Design Your Own Pillowcases

Our last project was basically a free project...nice on the budget!  I had done this activity before with a smaller group of young women.  You can view the original post here.  The pillowcases were donated from a hotel chain.  Before camp, we cut off a portion of the pillowcases and then added back a band of bright fabric.  All of our fabric was donated so these cute pillowcases didn't cost a thing!


The only thing purchased for this project was a few boxes of crayons.  Add to the fact that crayons are super cheap this time of year and this project cost us just a couple of dollars!


All the girls needed to do was decorate their pillowcase however they wanted to.  Once complete, we used an iron to heat set the design.  The girls who have done this project before say the pillowcases wash up just fine.


And that's it!  Another successful year at Girl's Camp....looking forward to the next!

I like to link to these great parties!


Aug 14, 2013

Girl's Camp Crafts

I've just returned from another year of Girl's Camp where my friend, Lisa, and I are the "Crafty Ladies."  It can be a lot of work, but also a lot of fun.  Here's a run down of what we did.

The "Super Strap" Water Bottle Strap


This year the adult leaders wanted to encourage the girls to carry around their water bottles, especially on the hikes.  We thought a good craft would be a water bottle strap.  I searched around the internet for ideas, then came up with something that would fit our needs at camp.  The main criteria for this craft was simplicity and no sewing!  My son, the night before leaving for a two-year church mission, recorded a song for me to use as an infomercial for the "Super Strap."  He wrote the music, played the instruments, and recorded the vocals.  I wrote the words and added the pictures.  As a side note, I'm going to miss his musical creativity over the next couple of years!


The straps were easy to make.  We cut strips of single knit fabric, 1" wide by the width of the fabric.  (Approximately 54-60" wide.)  


To make the strap, layer three strips on top of each other and thread the first 6", or so, through a round rubber gasket.  Note:  I searched around and found a gasket that fit over the cap of the water bottle that was provided for the girls.  When finding a size that will fit, take into consideration that the fabric will loop over two sides of the gasket, thus making the opening a bit smaller.  But, also consider that the gaskets stretch a little.  Our gaskets were rounded so they kind of "rolled" over the cap when putting them on.


Once the fabric strips are threaded through the gasket, fold the strips back on themselves and begin to braid your strap, encasing the ends of the strips as you braid.  To make the braiding easier, we had a 2x4 clamped to the table with binder clips screwed in place.  The girls were able to clamp their gasket in place, making it easier to braid.  Continue braiding until you get about 6" away from the end.  If your strips aren't the same length, trim them to match each other.


Thread the unbraided final 6" through the gasket again (only on the other side of the gasket) and fold the strips back onto themselves.  Using a safety pin, pin the end of each strip, one at a time, and weave the end back through the braid.  Note:  It helps if the strap is not braided super tightly!


If desired, you can use a dab of hot glue to tuck and secure the ends in place.  Depending on the stretchiness of your fabric, these can sling over the shoulder, across the body, and still hang a bit too low.  If that's the case, just tie a knot at the shoulder and bring the water bottle up to the desired length.  Obviously, the water bottle will hang lower when its full of water as opposed to when its empty!

Those individuals that do a lot of hiking will probably want a more sturdy way of carrying their water, but as for a girl's camp craft, this was inexpensive, useful, and the girls had fun making them!

Reflection Boards


This idea was not original.  We followed the tutorial found on the website, Brave Girls Club, for their dream boards.  We chose to call them "Reflection Boards" as we were always trying to reinforce that the girls see their true nature and inner beauty.  It was a fun activity, needed little instruction (woohoo!) and allowed the girls' individuality to really shine!  We ordered 9 x 12 canvas panels through Wholesale Arts and Frames for the base.  They were cheaper than stretched canvas frames.  Prior to camp, we asked for donations of unwanted scrapbook paper and embellishments from church members.  We were flooded with generous donations!  The girls had many cute things to choose from.  One 16 oz. bottle of Mod Podge was probably all we used for about 30 boards.

Beaded Macrame Bracelets


The girls needed to learn knots for certification, and this project reinforced their knowledge of the good ol' square knot!  We followed this great tutorial on the website, Smitten By A Knot.  We precut the cording and had packaged them in snack baggies.  The girls were able to choose their own beads.  I demonstrated the tying process by using a rope attached to a piece of foam core so they could see an oversized version of the process.  We used the same 2x4's with binder clips as we did with the super straps to secure our cording—along with a small piece of cardboard to pin into.   One trick we learned to make things easier was to tape the ends of the filler cords to the table, thus keeping them tight and free from tangles during the knotting process.  Just un-tape the filler cord when adding a bead, then re-tape in place.  This project required more instruction than our other projects until the girls got the hang of it.

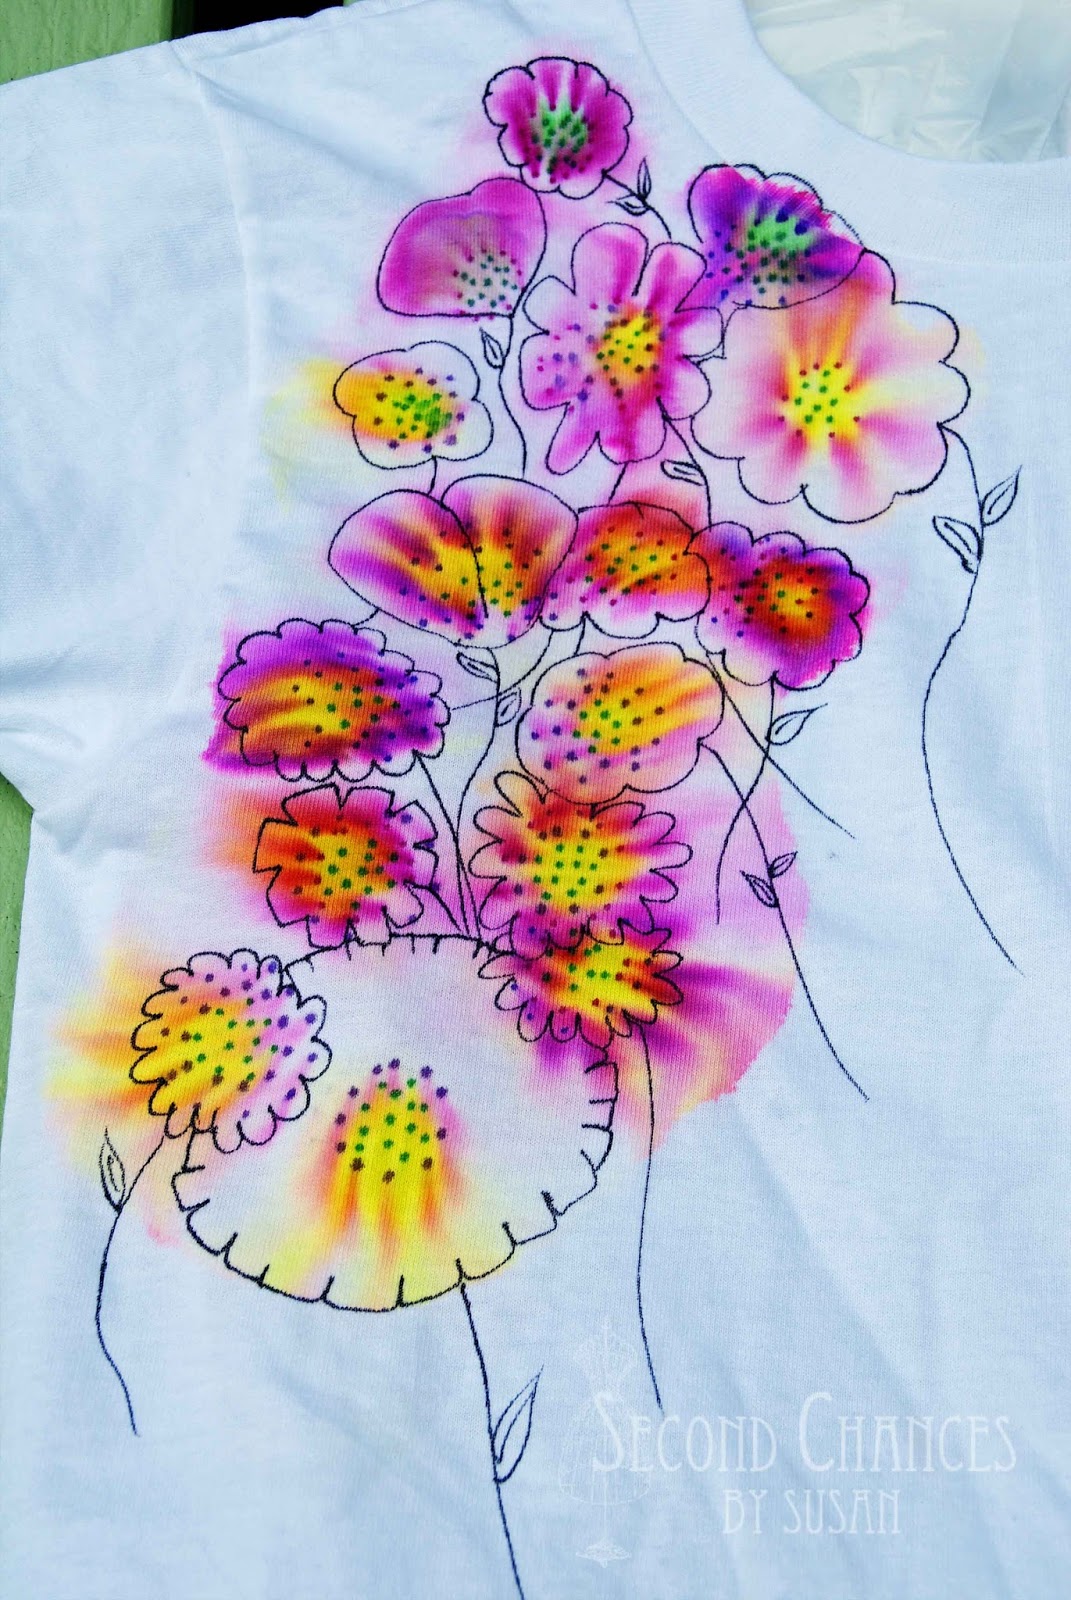
"Tie Dye" T-Shirts using Sharpie Markers


This was a fun, and very easy project.  You can find a few different ways to do this project.  We just had the girls place an eight gallon plastic bag in between the layers of their 100% cotton shirts.  They drew designs onto their t-shirts with sharpie markers, then dripped rubbing alcohol on the designs and watched the ink spread out.  I got the droppers from a pharmacy, and the best buy on markers was at Costco.  As for the rubbing alcohol, we used 70% solution.


It was fun seeing the different designs.  Some made circles of dots,


some drew "starbursts" (or asterisks),


some wrote words,


some placed their design tightly together,


and some added detail, when dry, by using an ultra fine sharpie.


We did notice that the ink spread out better on the 100% cotton t-shirts, as opposed to a blended t-shirts.  Also, some colors spread better than others so you might have some scraps for the girls to experiment with.  Heat set the t-shirts with a hot iron or dryer before wearing and washing.

It was another fun and successful year of crafts!

I like to link to these great parties!


Jan 14, 2012

Its About "Time"

Yes, its about "time" I did something with my ever-growing jewelry stash!  

I have a thing for jewelry and so does my sister-in-law, Kathy, over at Katalina Jewelry.  We have spent quite a few hours lately going through tubs and tubs (and I mean BIG tubs) of costume jewelry that is a by-product of The Jewelry Lady's (that's what she calls herself) precious metal business.   We love sorting through the piles of mismatched earrings, broken necklaces, watches, brooches, etc. looking for what we regard as treasure!  After several hours, our hands are dirty and our eyes are tired (especially if we forget our reading glasses...although, not to worry, sometimes we even find a pair of reading glasses in the pile!), but we are thrilled to walk away with a shoebox full of bling.  Then we get home, we dump out our treasure and sort through it all over again admiring the silver, gold, and rhinestones.  All the while trying to ignore the "why on earth do you need more jewelry?" look that is on the faces of our understanding husbands.    (Okay, maybe my brother doesn't give Kathy that look, but I have seen it on the face of my husband...a lot!)  I have tried to organize it the best I can.  I have great plans for it...someday.  But Kathy has issued a challenge to herself and I want to take on the challenge, too.  She has vowed to make something new each month from her stash of jewelry.  You can check out her January design here, it's beautiful!  For a real treat check out her series of jewelry made from shoes, her salt shaker necklace, and a cool piece she calls "Road Trip." You can also visit  her Etsy shop...she is one talented lady!

There's no "time" like the present, so on to the challenge.  I picked through some of the pieces and decided to build a design around a pocket watch I had picked up at a garage sale.  I threw in a few more pieces to work with.


As you can see, the pocket watch has a locomotive on it.  As a rule, I like trains.  My dad worked all his life for the railroad and I loved going to the train yard and looking for "Herbies" that were scrawled onto the freight cars.  Those are fond memories.
But, for this project, a train was not what I was looking for.  So, I removed the cover of the pocket watch.  I actually had to take the whole thing apart to reposition the watch face in the upright position.  It was kind of a pain and the watch doesn't function anymore, but its better than looking at it side ways!  I used wire to work a couple of round watches into the design.  I imagine that if I would put new batteries in them, they would actually keep time.  The flower at the base of the watch is an earring.  Originally, it had a screw-type back.  I removed the screw, but left the loop. This created a nice place to dangle a charm.  I did add another small silver piece to cover the hole at the top of the pocket watch that was exposed when I removed the cover.  After it was finished, I had fun finding interesting ways to photograph it in my backyard!

Hanging from the grape arbor using a low f-stop to blur the background.


Hanging from the grapevine.


On the old wooden bench that made its debut in this post.


Frozen rainwater (with yard debris) in the wheelbarrow. 


Broken down rocker used as a planter.


An old rusted metal suitcase.


Another wheelbarrow...no frozen water, just rust-covered with fallen leaves.


I knew there was a good reason for not doing Fall yard clean-up.  It gives me great backgrounds for taking pictures!  Well, what are you waiting for?  "Time" is of the essence, so start creating today!

I link to these great parties!

Featured on:
Knick of Time

May 29, 2011

Fishing Swivel Charm Bracelet

I bought a very full gallon size bag of jewelry pieces the other day for $10!  Included in the bag were tons of earrings, bracelets, necklaces, rings, you name it!  Some of the pieces were still wearable and I added those to my ever growing jewelry collection.  Other pieces were broken, or had lost its mate.  I figured it might be fun to make an eclectic charm bracelet.  Even though there were lots of pieces of chain in the bag that I could have used, I decided to go with a chain of fishing swivels instead.  I made three separate chains using (4) #10 barrel swivels for each chain.  I added a couple of copper beads to each "snap" section before closing it.  I purchased a toggle clasp that allowed me to hook the three chains to it while providing a little space between the chains (you can see what I mean in the following pictures.)  I then proceeded to attach a variety of "charms" to the fishing swivels, most of which were broken or lonely earrings.  I figure I have less than $4 into the whole project!


If you click on the following picture to enlarge it, you can better see the pieces that I hooked the three chains to.  These pieces came with a toggle clasp attached to them, but I removed the toggle clasp and opted for a more traditional, secure clasp.


This bracelet is fun to wear and reminds me of the charm bracelet I wore as a young girl.

Linking up to THESE great link parties!