Showing posts with label purses. Show all posts

Sep 3, 2016

Refashion Runway: The Riverside Blue Challenge

Well, here we are on the last week of Refashion Runway!  It's been a lot of fun this season.  The ladies who have participated are all so talented and friendly!  Beth, The Renegade Seamstress, has been the perfect hostess, as always!

This last challenge consisted of refashioning something in Pantone's color of the fall season, Riverside Blue.  I always find the color challenges a bit harder since you are limited as to what you can find in the thrift shops.  But, sometimes those limits help to push the creativity.

My challenge began with a black leather coat that I had in my stash.  I picked it up for $2.00, stored it away and forgot about it.  When I came across it again, I thought it might work well for this challenge.  All I needed was some denim in the right color.


Aug 20, 2016

Refashion Runway: The Button Challenge

First off, thanks to everyone following along, sewing along, and voting!  And, a big thanks to Beth for hosting this friendly sewing competition!

This week on Refashion Runway, the theme is buttons.  Of all the buttons to choose from, I went with basic white buttons.  But its what was needed to achieve the look I was going for.


Oct 28, 2013

Vintage Winter White


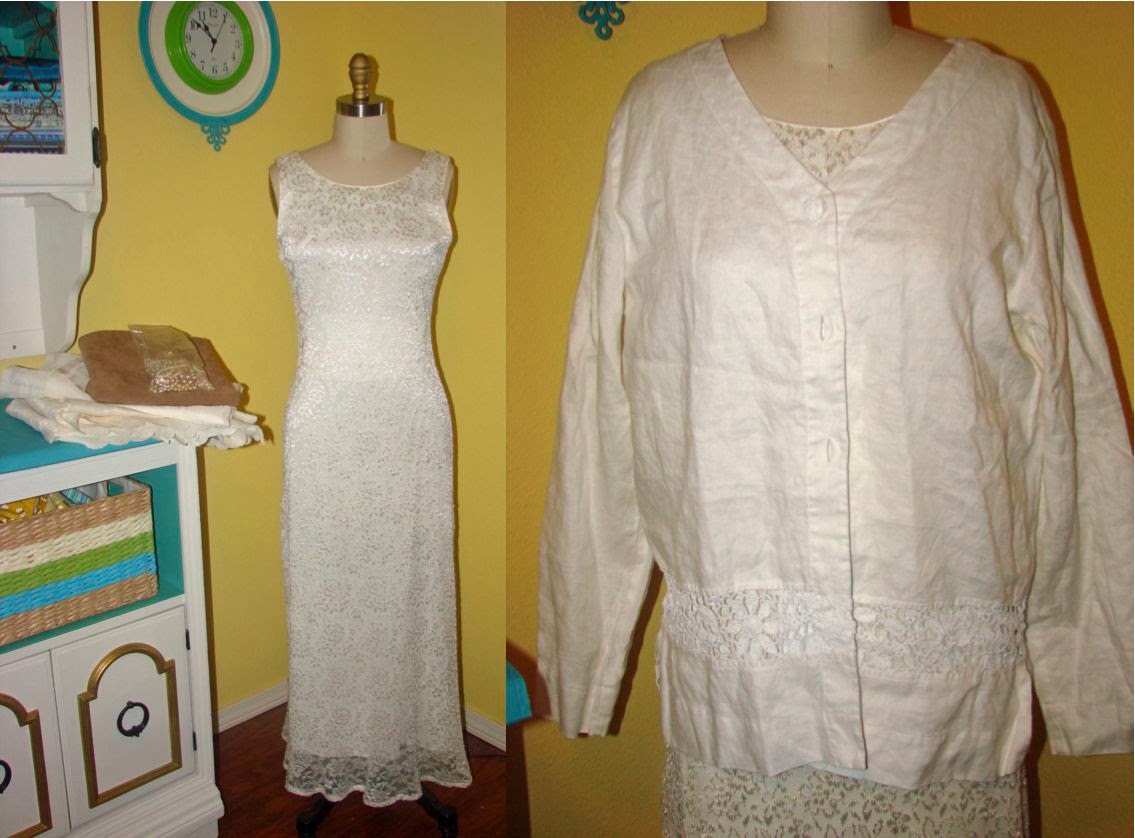
I'm not sure why, but when I start thinking about winter and the holiday season I get all nostalgic.  I love looking at pictures of the holidays during the 50's.  Everything seemed to be so much simpler then.  (Although, I wouldn't really know since I wasn't born yet!)  So it was natural for me to be drawn to a vintage vibe when it came to the winter white challenge.

I gathered all the white and cream things I had in my stash and gave some thought as to what I could do.  I decided on a stretch lace formal gown, a sheer curtain panel, a drapery panel, a piece of ultra suede, and a bag of pearls.  Later I added a linen blouse with crocheted lace.


Apr 30, 2013

How to Make a Duct Tape Purse and Flower


One of the more popular posts on my blog has been duct tape purses.  Many of you have contacted me asking for directions, especially for the flower.  I'm happy to announce that I have completed two videos that take you step-by-step through the process.  I hope you enjoy them!

This purse is made from denim blue and white duct tape with a yellow gingham fabric lining.  


It features a bright, bold yellow flower! 


The corners are boxed. 


The handles are secured with silver brads.


To view the video tutorials, just click on the photos below, or the links, where you will be redirected to my youtube channel.  If you like the videos, please like, share, or subscribe to my channel so you can be informed when new videos are available.  Thanks!!


 I like to link to these great parties!

Featured on:
Ginger Snap Crafts!


Feb 21, 2013

Corduroy Shirt Dress and Sweater Bag

After spending weeks hanging on my dress form, half done, I finally finished my latest refashion.  This dress was created from an XXL men's shirt and L men's sweater.  I spotted the shirt at the thrift shop and pictured it right away as a dress with a rolled sweater collar.  I patiently waited for it to go on sale.  In fact, in my waiting, I thought I had missed the opportunity when I went back and couldn't find it, but no worries, it was just hanging in a different spot.  So I snatched it up!


This is what I started with...


I used the lower half of the sleeves for my new 3/4 sleeves, retaining the cuff detail.  With the excess fabric from the upper part of the sleeves, I was able to lengthen the shirt to a more suitable dress length.


I left the shirt's collar band in place, but cut off the actual collar.  I used a portion of the removed collar to create a triangular extension so that one end of my new rolled collar could tuck neatly under the other end.  In fact, since the original collar was a button-down collar, I was able to utilize the existing buttonhole at the point of the collar to keep my new collar in place.


I added elastic to the waist so that it would cinch up evenly.


I had plenty of the sweater leftover and thought it would be fun to make a purse.  So back to the thrift shop for the lining and details.  I found an extra long belt with studs that I thought would be fun.  And, a pair of brown corduroy pants would be perfect for the lining and trim.


I love the corduroy plaid fabric!  The dress is comfortable and the purse is roomy.  Besides from a broken needle while sewing the purse, I think it was a success!

Shirt.....$3.00
Sweater.....$2.00
Belt.....$2.00
Pants.....$2.50

Total cost for dress and purse.....$9.50!

For a tutorial on the dress, click here!
For a tutorial on the purse, click here!

I like to link to these great parties!

Featured on:


Jan 5, 2012

Dollar Store Crafting-Activity Bags

I don't know about you, but I think The Dollar Store should be renamed The Twenty Dollar Store.  It seems that every time I enter that store, I can't leave until I have at least twenty dollars worth of stuff in my basket!  But, they do have some good stuff!  I figure a post every once in a while of something made from dollar store supplies might be kind of fun.  First up are activity bags, each made from two place mats and a pot holder.


Supplies needed for each bag:

2 placemats (one for the body, part of one for the handles)
1 pot holder, rectangular w/ pocket and loop (if it doesn't have a pocket, that's alright, you just won't be able to make small pockets to hold crayons)
8 zip lock sandwich bags
1 2/3 yd. double fold bias tape
1 yd. or less wide ribbon (enough to go around the circumference of the bag)
1 button
needle and thread
scissors
tape measure
chalk (or whatever your preference is in marking lines for sewing)
sewing machine

Pictures for this tutorial are unfortunately going to begin part way through the process (on account of some accidentally deleted photos!)  Therefore, I will try to explain the best I can.  Begin by cutting two strips about 1 1/4" wide by the width of your place mat.  These will be used for the handles.  The rest of this place mat won't be used, unless you want to fashion a pocket from it and stitch it to the bag.  You could also get by with just one place mat if you use ribbon or something else for the handles.  Next, finish the edges of the handles with double fold bias tape.  Position the handles on each end of the place mat (on the right side) and baste in place.  Apply the wide ribbon to the edge of the place mat, covering the ends of the handles.  For added strength, top stitch where the handles attach as seen in the photo below.


Next, fold the placemat (with the ribbons and handles already stitched on), right sides together.  Stitch the side seams.


At the bottom corner of each side seam, open the seam flat and stitch a boxed corner at each corner.


Turn the bag inside out.  This is the view from the inside.


This is the view from the outside.


Your bag is now complete.  How simple was that?!


Next on the agenda is the potholder organizer.  I wanted small pockets for twist-up crayons, so I measured off ten equal spaces and stitched them from the top of the pocket to the center of the potholder.


Once I completed that, I tested the pockets with the crayons.  Oops! They were too tight.  So I picked out every other seam which left me with five pockets.


The crayons fit much better with two crayons to a pocket.


I wanted zip lock bags in the middle to hold other supplies.  I had the hardest time finding the right bags! I really wanted the kind of bags that actually have the little plastic sliders to close them.  But....all the brands were too wide and the bags hung out over the edges of the potholder.  So I had to settle on regular zip lock bags that are made just a touch narrower.  Lay the bags on top of each other, alternating every other one.  I used eight bags, four each direction.  I held them in place with large paper clips.  Mark a line down the center.


Stitch the bags in place.


A view of the back.


Trim away the excess plastic.  Now I know that some of you might think it would be easier to use snack bags.  You could, but I think they might be harder to keep in place while you stitch them.


Stitch a button on the outside and fill it with fun stuff!


And there you go...a cute bag that can be filled with all sorts of fun stuff to keep little ones quietly entertained!

Featured on:

Nov 26, 2011

Duct Tape Purses

UPDATE 4/28/2013:  If you would like to view a step-by-step tutorial of a simple, fabric-lined duct tape purse, visit my youtube channel.  Become a subscriber so you can be informed when I add new videos!  Click here to view the video!

The other day I submitted some duct tape purses to the editor of Haute Handbags.  I received word today that they have chosen 3 of my 5 designs to include in their April 1 edition of the magazine!  I'll keep those designs a secret...you'll have to wait for the magazine.  But here are the two "rejects!"

The first one I named "Anenome" because it reminded me of the ocean.  I used chrome duct tape, silver brads, vintage jewelry, and D-rings to give it some silver accents.  The flower was made by backing a long strip of duct tape with another strip of duct tape—offsetting the strips about 1/4" so that you end up with both edges having 1/4" of stickiness.  Trim away one of the sticky edges.  With your scissors, make 1/8" snips in the tape, cutting to, but into the sticky edge.  This will create a "fringed" strip with an uncut sticky edge.  Determine how big you want your flower and make a circle base with the duct tape.  I overlapped side by side a couple of 3" long pieces of duct tape, backed them with the same, then cut it into a 3" circle.  Starting with the outside edge of the circle, begin to stick your fringe onto the base.  Keep adding the continuos fringe around the circle until you get to the center.  You may need to cut more fringe to complete the flower.  Using epoxy, add a vintage piece of jewelry to the center.  Epoxy, or hot glue gun the flower to the bag.


The next one I named "Black Tie."  It has a fancy tuxedo look to it.  I folded the white duct tape over on itself to within 1/4" of the edge, leaving a sticky strip.  Then I gathered it as I stuck it to a duct tape base.  Chrome duct tape was also used for accents.  The black tie is actually a shoe clip that is epoxied in place.  The fabric lining wraps over the top edge to the front to add some extra interest to the purse.  Small black brads were added to the base of the handles to make them more secure.


I always knew that duct tape was functional, but who knew it could be so pretty also?

UPDATE:
I just finished one more purse to add to the mix.  This one has a different flower.  It's made the same way as the first one, only cut with petals instead of "fringe."
Watch my youtube video to see how its done!


Featured on: