Our daughter got married this summer. And, although this wasn't as thrifty as the past two weddings, (you can view them
here and
here), we still had some thrifty elements in the decorations. For instance, we saved money on the table linens by getting free kingsize sheets from the Hilton hotel chain. They were a nice white on white stripe. I cut them into large circles and then overlocked the edges. The lace for all the burlap squares was given to me for free. The mason jars, vases, corks, and tea light holders used for centerpieces were all thrifted. The barn wood and barn doors came from a barn we dismantled earlier in the year. Lace and sheer curtain panels that had been thrifted over the years were also used.
The welcome sign was thrifted and originally showcased an oriental-themed picture. I spray painted over the picture with chalkboard paint. I also painted and distressed the frame. The idea for the wording came from the internet (I apologize for not being able to locate the original source!) I used white chalk paint pens for the lettering. It gives a much crisper result as opposed to regular chalk. If you make a mistake, just wipe it away with a wet cloth and start again. The rustic easels were free, made from fallen cedar trees on our property and fastened together with wooden dowels. Enjoy!
The gift tables were covered with vintage crocheted table clothes and tied with burlap bows.
The guest sign-in table was adorned with this shabby chic wooden candelabra. It was stained dark brown when I picked it up at a thrift store. I painted and distressed it, then glued five pint-sized mason jars in place. Filled with flowers, it made a beautiful vase. It sat atop a lace-edged burlap square with a few pinecone flowers surrounding it.
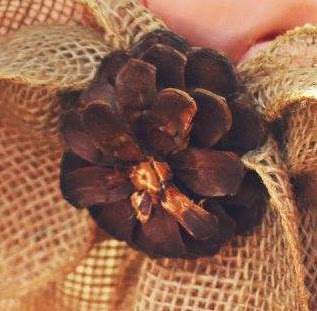
The pinecone flowers were made by using a chop saw to cut the bottom from a pinecone. I also cut the remaining part of the pinecone again to have a whole different looking flower. Essentially, I got three flowers from each pinecone. The picture below shows flowers cut from the bottom of the pinecone. Other pictures in this post shows flowers cut from the center of the pinecone. A helpful hint: Hold the pinecone securely with a pair of pliers when cutting to keep your fingers safely away from the blade!
A slate arrow points the direction of the ceremony.
The bride arrived at the ceremony in this sweet vintage truck, owned by the groom's grandfather.
The bride's bouquet was placed in a burlap-wrapped mason jar and became the centerpiece of the wedding guest table during the reception. The bride's attendants' bouquets were also used at the same table.
A slate arrow points to the reception area.
Hay bales, topped with barn wood, doilies, jars of flowers, and tea lights, were placed around the reception area and acted as small tables for guests to sit around.
We purchased the outdoor "Edison" lights from Costco and strung them over the dance floor, along with tissue paper pom-poms. A paper lantern was hung in the center of the dance floor and was illuminated by one of the lights on the string. We wrapped some of the tree trunks with strands of white lights.
The wedding party table was decorated with thrifted sheer curtain panels, each tied with a burlap bow and a flower cut from the center of a pinecone.
See how the flowers look different depending on if they are cut from the bottom or the
middle of the pinecone?
Each centerpiece included a variation of a mason jar wrapped and tied with burlap ribbon, a single white vase. a tea light candle, a picture of the couple (usually placed in the cork holder), a variety of pinecone flowers, and a small log round with the couples initials carved into it. All of these sat atop a vintage doily placed in the center of a lace-edged burlap square.
The menu board was made from a thrifted mirror. I replaced the mirror with a piece of masonite that I sprayed with chalkboard paint. I painted the frame and distressed it a little. It was displayed on another rustic easel.
A helpful hint: Prepare the chalkboard surface by covering it with chalk and then erasing it. Print (or freehand) your words onto paper. Cover the backside of the paper by rubbing a flat piece of chalk over it. Place your paper in position, chalk side down, onto your board and lightly tape it in place. Trace over your words with a pencil to transfer them onto your board. Remove the paper and you will have perfect lines to follow!
The groom and his friends made the cake stand from wood rounds. They attached the rounds to the main stand and then "stair-stepped" them from there. They also carved the bride and groom's initials into the stand. The groom's mom made the wedding cake.
The groom's aunt made all the lovely cupcakes.
The flower girl was a dancing machine that night! She even caught the bouquet!
We set up a photo-op area using old barn doors, bales of hay, sheer lace curtains, a vintage bed spread, and paper buntings (which were recycled from
this previous wedding!)
Also in the photo-op area were a couple of frames to use for props.
The beautiful bride.
As the guests left, they could take with them a heart-shaped bird seed ornament to hang on a branch. The bride and her sister had a fun afternoon making these!
Tags were punched, stamped, and tied onto the bird seed hearts.
The evening ended with a beautiful sunset!
I like to link to
these great parties!


