In celebration of Valentine's Day, our church decided to put on a dance for the adults. I was invited to help with the planning. The idea was to keep it simple (mainly just food and music), and for the most part it was simple, except for a few fun additions.
After the initial invitation to help, I immediately began to think of possible themes for the dance, especially a theme that could include dressing the part. I was drawn to a decades dance, primarily the 1960's! And so it began, my mind started racing with all the possibilities. Of course, there was a budget to keep to, so most of my ideas were going to have to be DIY and repurposed.
We were going to need the basics, such as lighting, refreshment table, centerpieces, wall decor, etc. But, I also was thinking of adding in some fun activities and a photo op scene. I hope you enjoy what I came up with as much as I enjoyed creating it!
When the guests arrived, they were transported back in time with this retro living room.
I replaced the traditional foyer furniture with four matching retro chairs that just happened to be at the church already. I brought in a mod looking rug from my son's bedroom, a lamp from my family room, and a aqua painted TV tray from my game room.
The whole retro living room idea sprang up from the idea of showing some opening and closing credits from a variety of 60's TV shows. We could have just watched them on a regular TV that sat atop a roll around cart, but where's the fun in that? So I figured I needed to change things up a bit and make a retro TV.
I picked up a piece of 1/2" thick cardboard from an appliance store. I drafted a design, cut it out and built a box. I covered the whole thing with blonde woodgrain contact paper (thrifted who knows how long ago!) and edged it with real wood trim. I cut two oval openings at the lower front of the TV and covered them with burlap for the speakers. I picked up four tapered legs from a reuse-it store, covered them with contact paper and attached them. It took a bit of searching, but I finally found a couple of old TV knobs from a TV repair shop. The antennae is made from knitting needles.
The back of the TV was left open so that I could get my computer monitor in and out easily. The monitor sat inside on a stand built to the right height of the TV front opening. We just spliced a bunch of old TV shows together and looped them. They continued to play throughout the night. I kept my wireless keyboard and mouse in the cute little retro suitcase to the right for easy access. A lot of memories came flooding back while listening to the themes from shows like The Monkees, Get Smart, Bewitched, The Flintstones, The Beverly Hillbillies, The Andy Griffith Show, Gilligan's Island, etc. There were a few commercials from the 60's thrown in for fun!
I couldn't leave the walls empty, so I brought a few vases from home to add to the shelves, and hung a mirror that I made from free paint sticks, a round metal decorative wall hanging, bamboo skewers, and small round mirrors. The retro phone came from my sewing studio.
To finish off the scene, I made a retro coffee table from plywood, the same blonde wood grain contact paper as the TV, and large metal shelf brackets for legs. I topped it off with some vintage magazines from the 60's and a vintage candy dish.
I was really happy with the way the whole scene came together.
Moving on to the main dance hall, the guests passed through a beaded curtain flanked with polka dot sheers, all thrifted. I mean, you have to have beads, its the 60's!
The refreshment table was lit with icicle lights covered with the same table skirting I made for three of my kids' wedding receptions. (Made from free hotel sheets, they have come in handy many times!) The walls were decorated with lots of paper flowers, smiley faces, and peace signs cut from my Cricut. We hung outdoor Edison lights I had purchased for my daughter's wedding around the perimeter of the room.
We had a hula hoop contest, which was a hit!
We also played the "Not So" Newlywed Game with some of our church leaders and their wives.
The lamp centerpieces were recycled from a previous church activity that had a Moroccan theme. I figured they would fit in with the 60's vibe. The center squares were cut years ago from some hot pink vinyl I picked up at a thrift store.
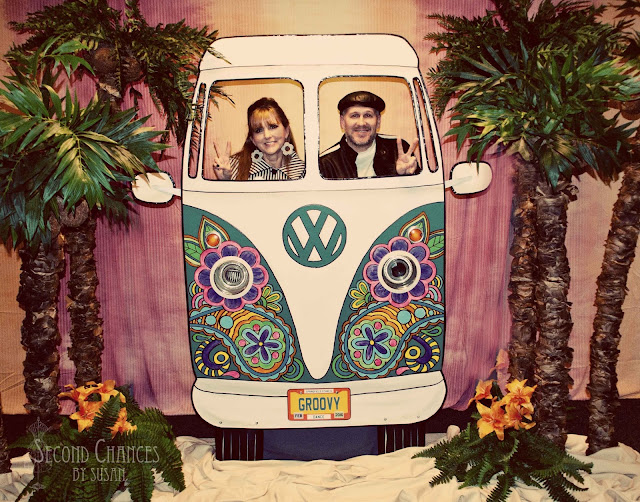
One of my favorite scenes was the groovy photo op bus. I used the same 1/2" thick cardboard as the TV to make the bus. The headlights were parts from a couple of recessed lighting fixtures I picked up from a thrift store. The fixtures were missing the actual lights, so I glued a small, clear decorative plate to the inside of each to give them the look of real headlights. The small reflector lights are inset into mason jar rings. The mirror arms are metal shelf brackets purchased from a reuse-it store. The license plate was cut from my cricut and actually sports the month and year of the groovy dance. The whole bus was hand painted and then edged with black duct tape to cover the cut cardboard edges. For inspiration, I enjoyed several hours of music from the 60's as I designed, cut, painted, glued, and taped!
The ombre-dyed sheets were recycled from the same Moroccan activity as the table lamps. The palm trees were recycled from a South Seas activity that we had had previously. Can I just mention how thankful I am that we built a barn this past year with lots of storage space?!
Of course, the whole evening wouldn't be complete without the right outfits. I was originally going to wear my mod 60's dress from this previous post, but who am I kidding, this was a good excuse to sew and create something new! My husband, however, was perfectly fine recycling his outfit!
This time I opted for a whole black and white ensemble. I used this retro influenced Simplicity pattern to make a coat from a thrifted bed sheet I had in my stash.
I added some black piping to the collar, and a vintage flower brooch. It went together pretty quickly.
I was going to make the dress also from the pattern until I looked in my refashion closet and pulled out a black and white dress that just needed to be taken in a little. It had a black strip around the bottom already, but I added some white to really make it stand out. Plus I had previously thrifted some black and white loafers that matched perfectly, and as a bonus, they were comfortable for dancing!
I picked up a mod necklace from my favorite $2 jewelry shop. The white with black polka dot earrings came from Goodwill. And, how fun was it to wear false eyelashes?!
I also thrifted a fun crocheted purse and hat. And to top it off, some oversize white framed sunglasses.
My adorable parents! I loved watching them dance together that night...so cute!
And that was our groovy dance....peace out!
I like to link to these great parties!


